[Linux]多线程编程
作者:小教学发布时间:2023-10-01分类:程序开发学习浏览:259
[Linux]多线程编程
文章目录
- [Linux]多线程编程
- pthread_create函数
- pthread_join函数
- pthread_exit函数
- pthread_cancel函数
- pthread_self函数
- pthread_detach函数
- 理解线程库和线程id
Linux操作系统下,并没有真正意义上的线程,而是由进程中的轻量级进程(LWP)模拟的线程,因此Linux操作系统中只会提供进程操作的系统接口。但是为了用户操作方便,Linux操作系统提供了用户级的原生线程库,原生线程库将系统接口进行封装,让用户可以像使用操作真正的线程一样进行线程操作,另外由于使用的是原生线程库,编译代码时需要指明线程库进行链接。
pthread_create函数
pthread_create函数用于创建线程。
//pthread_create函数所在的头文件和函数声明
#include <pthread.h>

int pthread_create(pthread_t *thread, const pthread_attr_t *attr, void *(*start_routine) (void *), void *arg);
-
**thread参数:**返回线程ID
-
**attr参数:**设置线程的属性,attr为NULL表示使用默认属性
-
start_routine参数:是个函数地址,线程启动后要执行的函数
-
**arg参数:**传给线程启动函数的参数
-
**返回值:**成功返回0,失败返回错误码。(由于线程共用同一个地址空间,因此不采用设置全局变量errno的方式记录错误码)
编写如下代码进行测试:
#include <iostream>
#include <unistd.h>
#include <pthread.h>

using namespace std;

void *thread_run(void *args)
{
    while(true)
    {
        cout << "new pthread running" << endl;
        sleep(1);
    }
    return nullptr;
}

int main()
{
    pthread_t t;
    int n = pthread_create(&t, nullptr, thread_run, nullptr);
    if (n!=0) cerr << "new thread error" << endl;

    while(true)
    {
        cout << "main pthread running, new pthread id: " << t << endl;
        sleep(1);
    }
    return 0;
}
编译代码并运行查看结果:
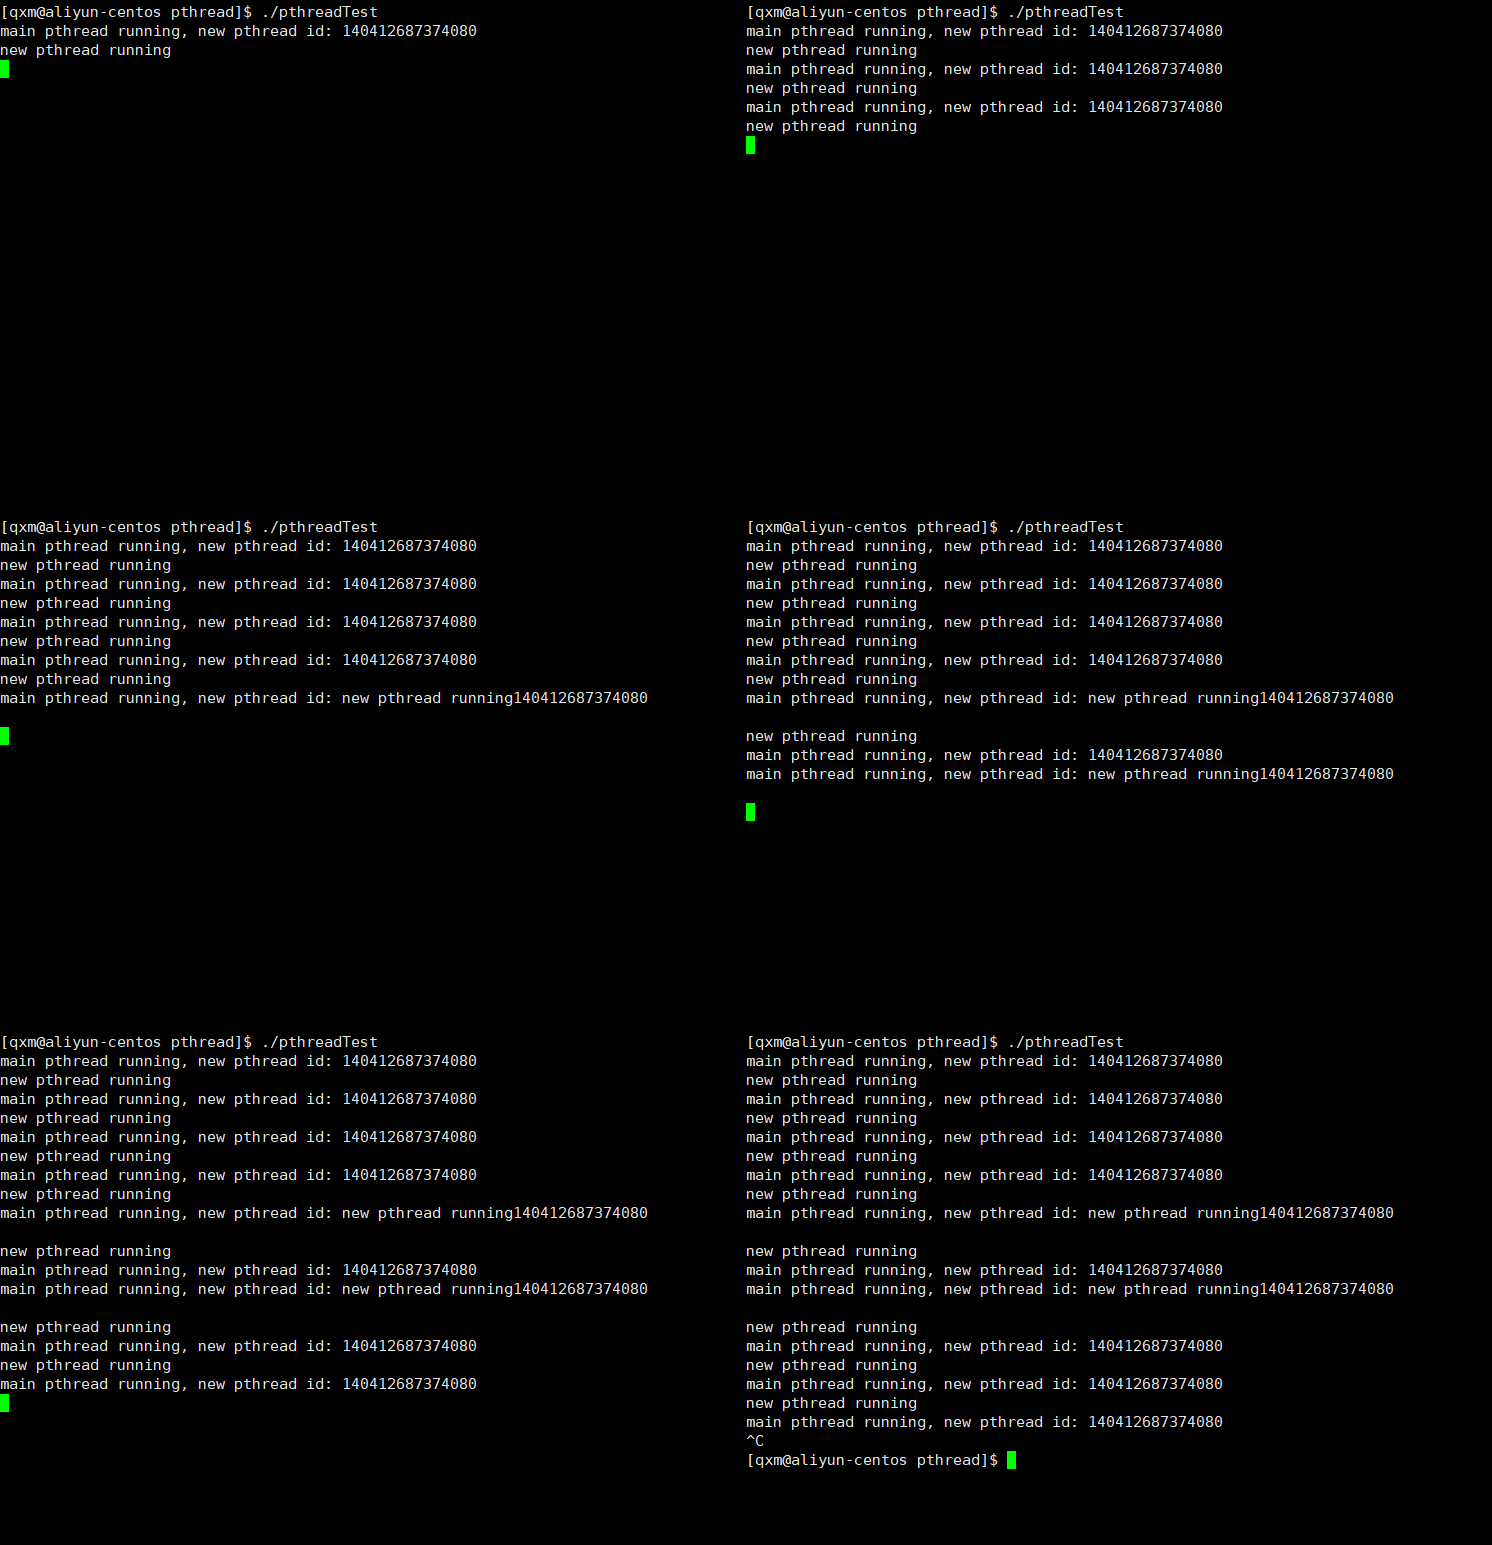
另外,可以使用Linux操作系统的指令ps -aL | head -1 && ps -aL | grep 进程名查看线程:

其中LWPid和pid相同的是主线程,其余的是新线程。
pthread_join函数
和进程类似,Linux操作系统下线程退出后,也要进行线程等待回收新线程,因此提供了pthread_join函数。
//pthread_join函数所在的头文件和函数声明
 #include <pthread.h>

int pthread_join(pthread_t thread, void **retval);
- thread参数: 要等待并回收的新线程id。(
pthread_create函数创建新线程时的输出型参数thread) - retval参数: 作为输出型参数接收线程退出的返回值。
- **返回值:**成功返回0,失败返回错误码。
- 如果线程被取消了,retval参数会接收到
PTHREAD_CANCELED ((void *) -1)。
注意: 由于线程异常会产生信号直接导致进程终止,因此线程等待回收时不需要考虑异常情况检测。
编写如下代码进行测试:
#include <iostream>
#include <unistd.h>
#include <pthread.h>

#define NUM 10

using namespace std;

void *thread_run(void *args)
{
    while(true)
    {
        cout << "new pthread running" << endl;
        sleep(4);
        break;
    }
    return (void*)0;//返回值为0的数据
}

int main()
{
    pthread_t tid[NUM];
    for (int i = 0; i < NUM; i++)
    {
        int n = pthread_create(tid+i, nullptr, thread_run, nullptr);
        if (n!=0) cerr << "new thread error, thread-" << i << endl;
    }

    void *ret = nullptr;
    for (int i = 0; i < NUM; i++)
    {
        int m = pthread_join(tid[i], &ret);//等待回收新线程
        if (m!=0) cerr << "new thread join error, thread-" << i << endl;
        cout << "thread-" << i << "quit, ret: " << (uint64_t)ret << endl;//打印新线程退出返回值
    }

    cout << "all thread quit" << endl;//打印说明所有线程退出

    return 0;
}
编译代码并运行查看结果,在进程执行时采用指令while :; do ps -aL | head -1 && ps -aL | grep 进程名; sleep 1; done检测进程:
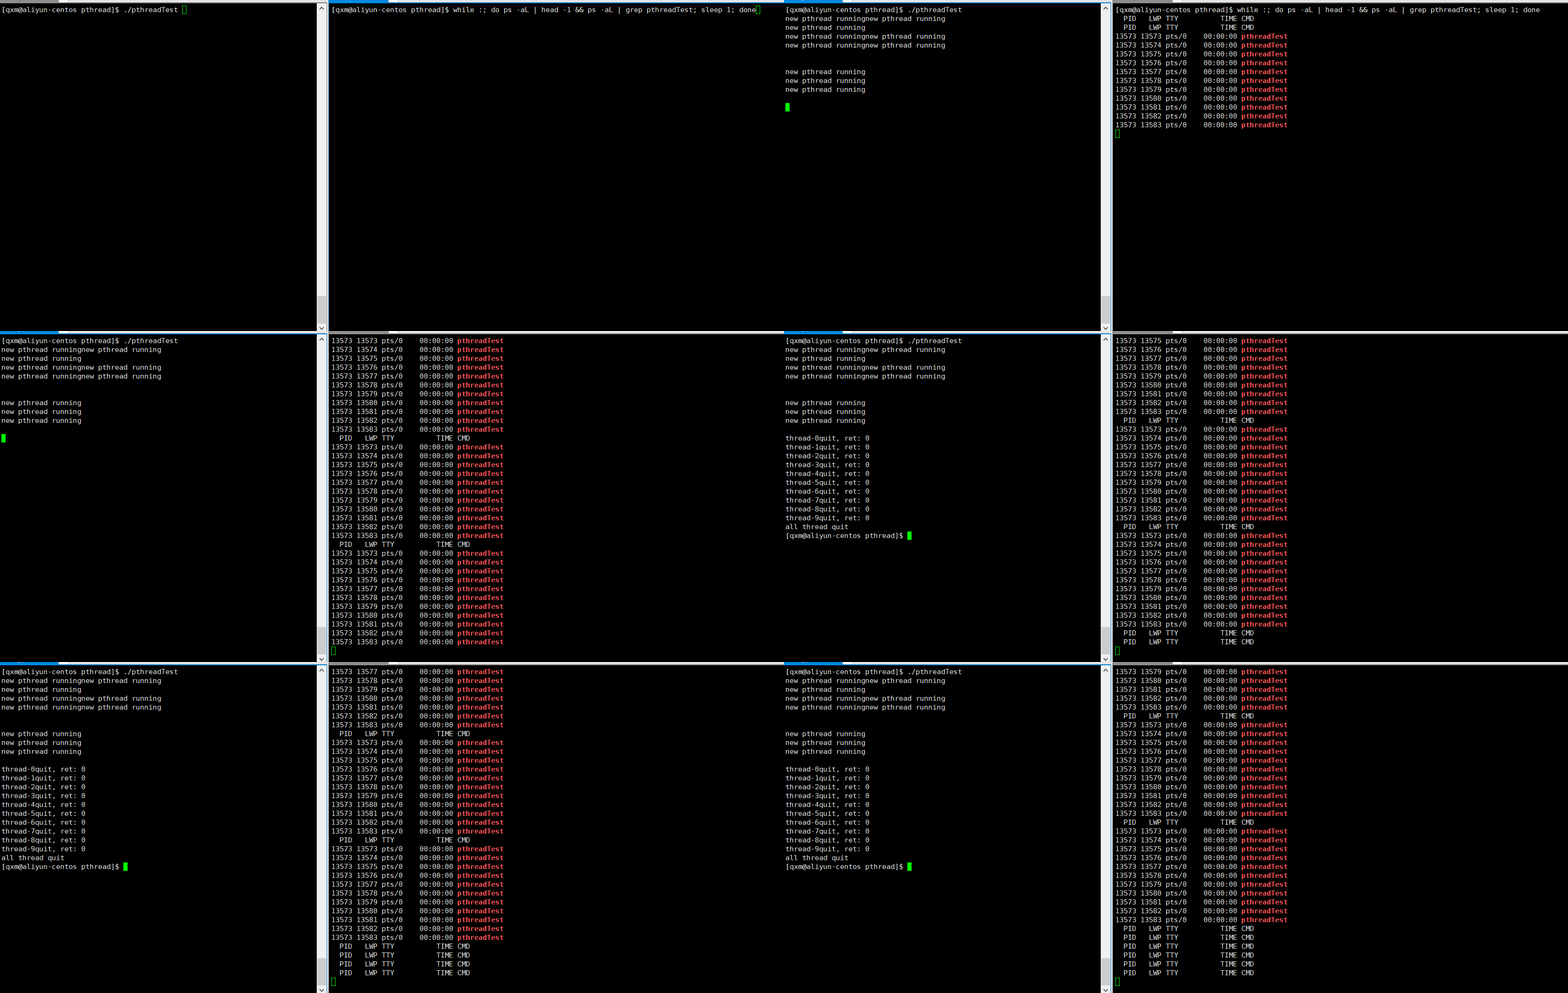
可以看到线程退出return返回了返回值为0的数据,主线程调用pthread_join能够成功接收返回值。
pthread_exit函数
Linux操作系统下线程退出的方式:
- 线程执行函数结束,return返回
- 调用
phread_exit函数退出线程
注意: 无论是线程执行函数结束,return返回还是调用phread_exit函数退出线程,最终都会给主线程返回一个void *类型的返回值。
//pthread_exit函数所在的头文件和函数声明
#include <pthread.h>

void pthread_exit(void *retval);
- retval参数: 作为线程终止的返回值返回给主线程。
编写如下代码进行测试:
#include <iostream>
#include <unistd.h>
#include <pthread.h>

#define NUM 10

using namespace std;

void *thread_run(void *args)
{
    while(true)
    {
        cout << "new pthread running" << endl;
        sleep(4);
        pthread_exit((void*)1);
    }
}

int main()
{
    pthread_t tid[NUM];
    for (int i = 0; i < NUM; i++)
    {
        int n = pthread_create(tid+i, nullptr, thread_run, nullptr);
        if (n!=0) cerr << "new thread error, thread-" << i << endl;
    }

    void *ret = nullptr;
    for (int i = 0; i < NUM; i++)
    {
        int m = pthread_join(tid[i], &ret);//等待回收新线程
        if (m!=0) cerr << "new thread join error, thread-" << i << endl;
        cout << "thread-" << i << "quit, ret: " << (uint64_t)ret << endl;//打印新线程退出返回值
    }

    cout << "all thread quit" << endl;//打印说明所有线程退出

    return 0;
}
编译代码并运行查看结果:
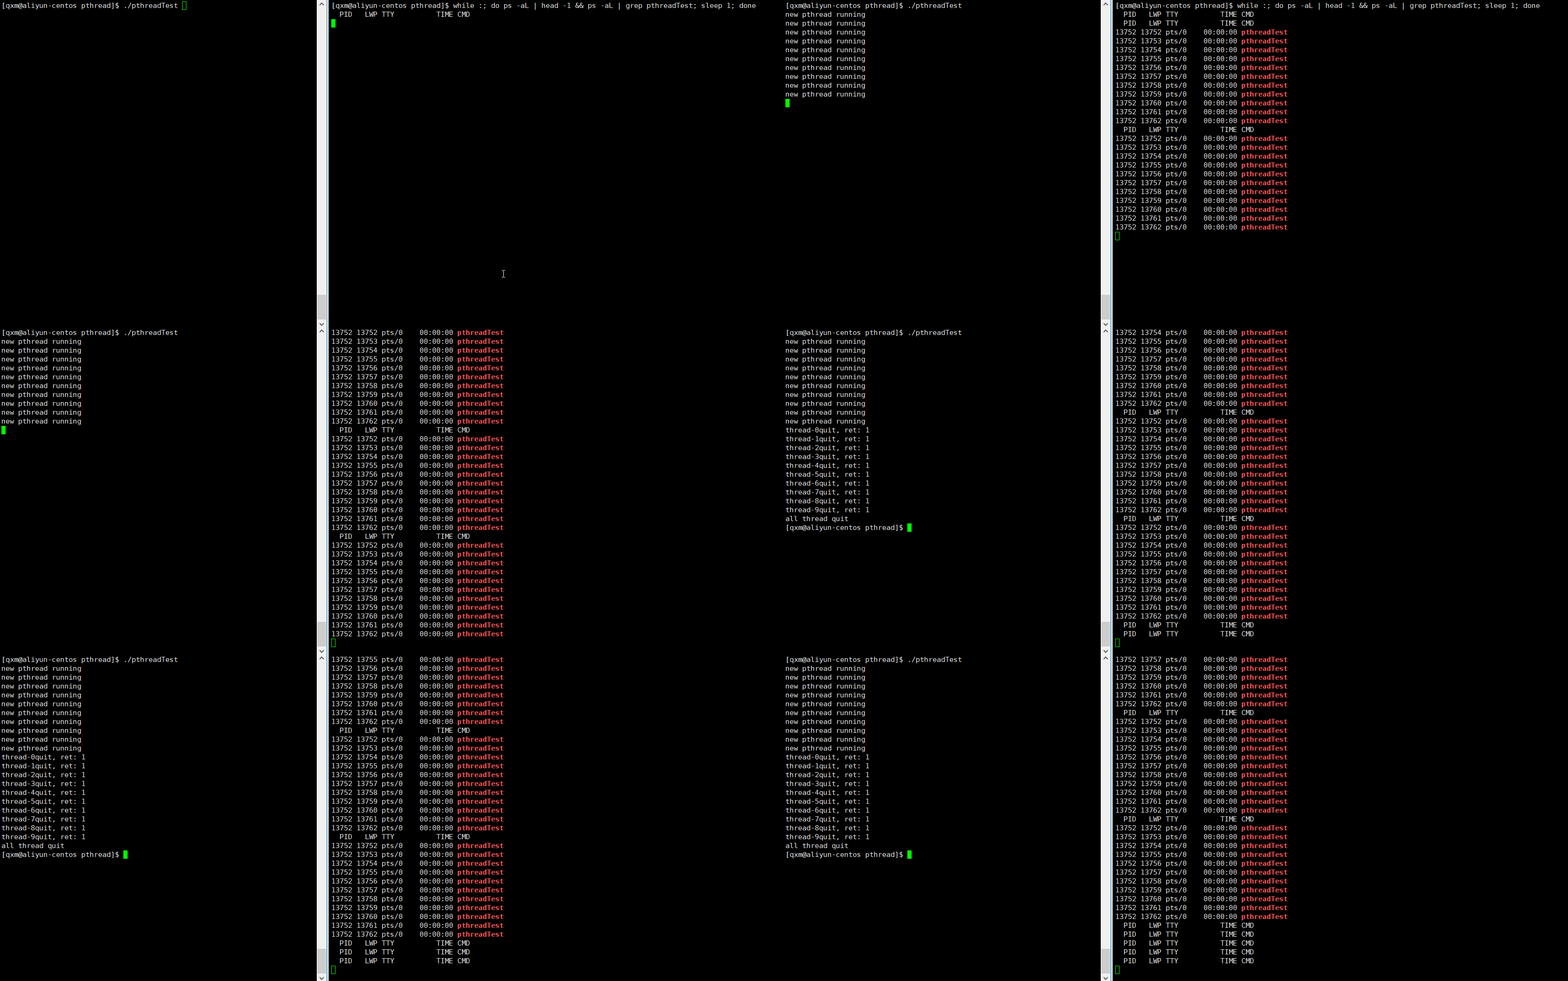
可以看到线程退出phread_exit返回了值为1的数据,主线程调用pthread_join能够成功接收返回值。
pthread_cancel函数
pthread_cancel函数能够将正在运行的线程取消。
//pthread_cancel函数所在的头文件和函数声明
#include <pthread.h>

int pthread_cancel(pthread_t thread);
- thread参数: 要取消的线程id。
- **返回值:**成功返回0,失败返回错误码。
编写如下代码进行测试:
#include <iostream>
#include <unistd.h>
#include <pthread.h>

using namespace std;

void *thread_run(void *args)
{
    while (true)//新线程死循环执行代码
    {
        cout << "new thread running" << endl;
        sleep(1);
    }
    pthread_exit((void *)11);
}

int main()
{
    pthread_t t;
    pthread_create(&t, nullptr, thread_run, nullptr);

    int cnt = 3;
    while (true)
    {
        sleep(1);
        if ((cnt--) == 0)
        {
            pthread_cancel(t);//取消新线程
            break;
        }
    }
    sleep(2);
    void *ret = nullptr;
    pthread_join(t, &ret);//等待回收新线程
    cout << "new thread quit " << "ret: " << (int64_t)ret << endl;
    return 0;
}
编译代码并运行查看结果:
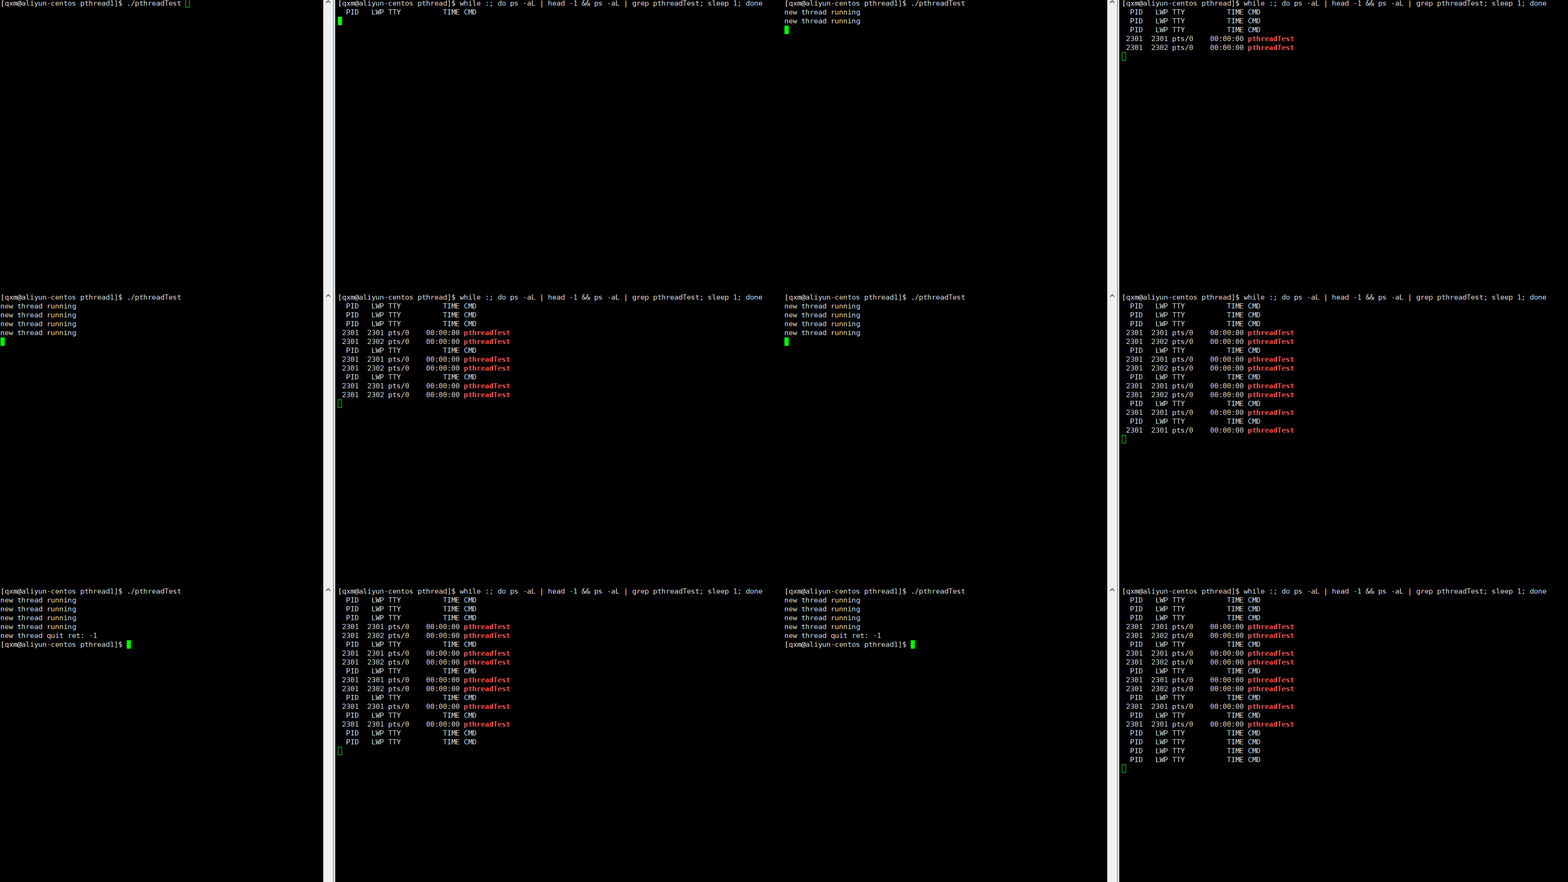
死循环的新线程被主线程取消了,新线程被取消后,主线程pthread_join函数接收到的是PTHREAD_CANCELED ((void *) -1)。
pthread_self函数
pthread_self函数用于获取当前线程的线程id。
//pthread_self函数所在的头文件和函数声明
#include <pthread.h>

pthread_t pthread_self(void);
- 返回值: 返回调用线程的线程id。
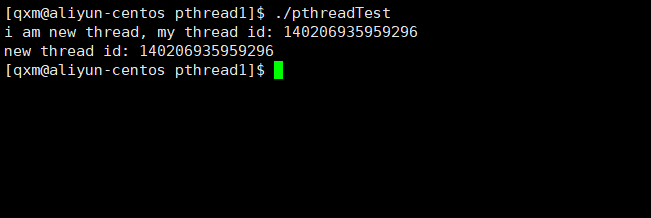
编写如下代码进行测试:
#include <iostream>
#include <pthread.h>

using namespace std;


void *thread_run(void *args)
{
    pthread_t tid = pthread_self();
    cout << "i am new thread, my thread id: " << tid << endl;
    return nullptr;
}

int main()
{
    pthread_t t;
    pthread_create(&t, nullptr, thread_run, nullptr);
    pthread_join(t, nullptr);
    cout << "new thread id: " << t << endl;
    return 0;
}
编译代码并运行查看结果:
pthread_detach函数
默认情况下,新创建的线程退出后,需要对其进行pthread_join操作,否则无法释放资源,从而造成系统泄漏。如果我们将线程分离,当线程退出时,自动释放线程资源。Linux操作系统下提供了pthread_detach函数用于分离线程。
//pthread_detach函数所在的头文件和函数声明
#include <pthread.h>

int pthread_detach(pthread_t thread);
- thread参数: 要分离的线程id。
- 线程分离后无法进行
pthread_join操作,如果使用了就会报错。
先编写如下代码进行测试:
#include <iostream>
#include <unistd.h>
#include <pthread.h>
#include <cstring>

using namespace std;

void *thread_run(void *args)
{
    int cnt = 5;
    while(true)
    {
        cout << (char*)args << " : " << cnt-- << endl;
        if (cnt==0) break;
    }
    return nullptr;
}

int main()
{
    pthread_t t;
    pthread_create(&t, nullptr, thread_run, (void*)"new_thread");
    pthread_detach(t);//分离线程

    int n = pthread_join(t, nullptr);//线程等待
    if (n != 0)
    {
        cerr << "pthread_join error: " << n << " : " << strerror(n) << endl;
    }
    return 0;
}
编译代码并运行查看结果:
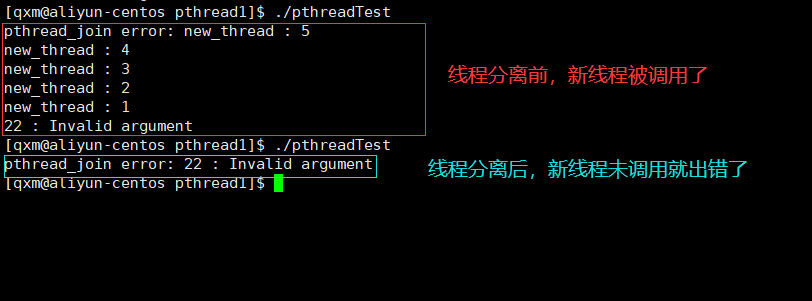
由于主线程和新线程的调度问题,造成了如上两种情况,但是无论哪种情况,新线程分离后,在进行等待操作就会报错。
再编写如下代码进行测试:
#include <iostream>
#include <unistd.h>
#include <pthread.h>
#include <cstring>

using namespace std;

void *thread_run(void *args)
{
    pthread_detach(pthread_self());//线程分离
    int cnt = 5;
    while(true)
    {
        cout << (char*)args << " : " << cnt-- << endl;
        sleep(1);
        if (cnt==0) break;
    }
    return nullptr;
}

int main()
{
    pthread_t t;
    pthread_create(&t, nullptr, thread_run, (void*)"new_thread");
    int n = pthread_join(t, nullptr);//线程等待
    if (n != 0)
    {
        cerr << "pthread_join error: " << n << " : " << strerror(n) << endl;
    }
    return 0;
}
编译代码并运行查看结果:
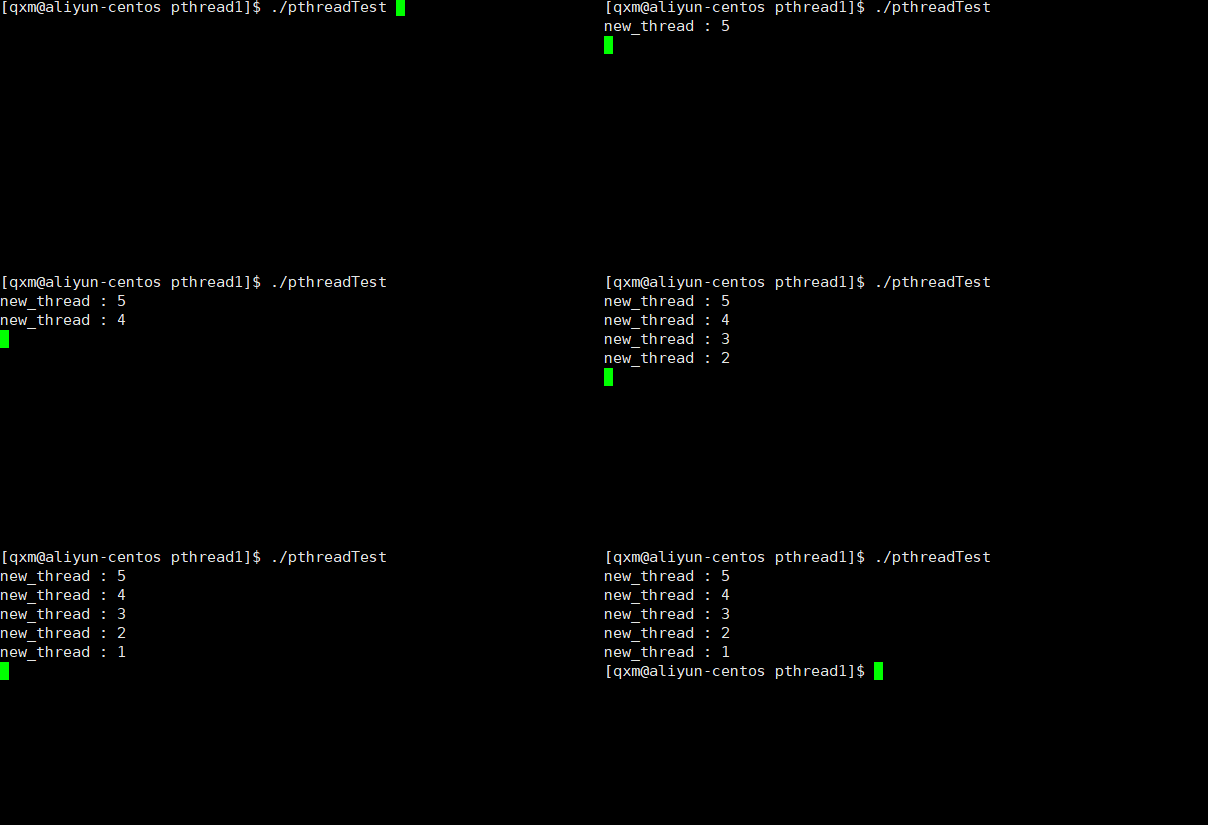
主线程先进行等待,新线程后进行分离,就会造成如上这种即使线程分离了等待操作也未报错。因为在主线程进行等待操作时检测新线程未分离,就直接进入阻塞等待新线程的状态了,因此不会报错。
理解线程库和线程id
Linux操作系统下,没有真正的线程,而是用轻量级进程模拟的线程,因此Linux操作系统只能以轻量级进程的方式进行管理,而不能以线程的方式管理,而线程库要给用户提供线程相关的各种各样的操作,线程库就要承担一部分操作系统不具有的线程管理操作,因此用于调用线程库创建线程时,线程库就要创建对应的数据结构记录线程的属性以用于管理线程,在后续调用线程库操作线程时,线程库就会利用之前创建的记录属性的结构和封装的一些系统接口来实现线程操作。
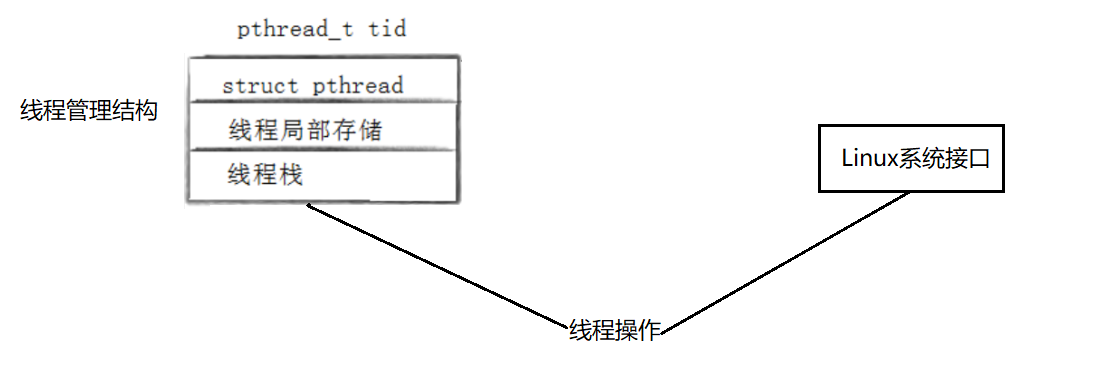
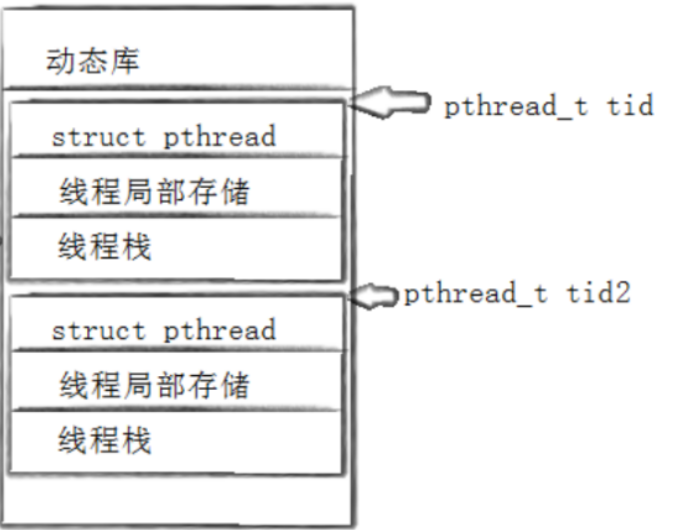
线程库在组织线程管理结构时,会将其线性的记录在进程地址空间上,而线程管理结构在进程地址空间上的首地址就是线程库提供的线程id。
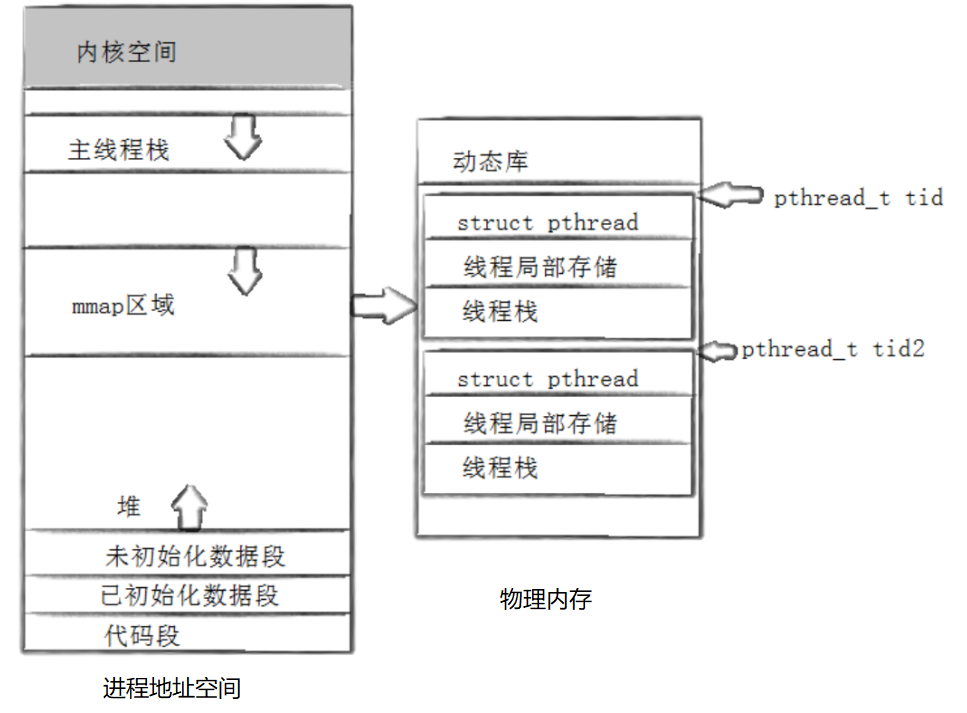
在线程库提供的线程管理结构中,存在一部分空间称为线程栈,线程栈是每个新线程私有的栈,新线程会将创建的临时变量存在线程栈中,将每个线程的数据分离开,以便进行数据的管理,而主线程使用的是进程地址空间中的栈结构。
说明: 在Linux操作系统下,C++提供的线程操作都是对原生线程库的封装。
编写如下代码进行测试:
#include <iostream>
#include <unistd.h>
#include <thread>

using namespace std;

void run1()
{
    while(true)
    {
        cout << "thread 1" << endl;
        sleep(1);
    }
}
void run2()
{
    while(true)
    {
        cout << "thread 2" << endl;
        sleep(1);
    }
}
void run3()
{
    while(true)
    {
        cout << "thread 3" << endl;
        sleep(1);
    }
}


int main()
{
    thread th1(run1);
    thread th2(run2);
    thread th3(run3);

    th1.join();
    th2.join();
    th3.join();

    return 0;
}
在编译时不加-lpthread选项并运行程序结果如下:

由于C++的线程操作是封装原生线程库得来的,如果编译时不链接原生线程库,在程序执行时,操作系统会无法正确的加载动态库到内存中,会导致程序无法正常执行。
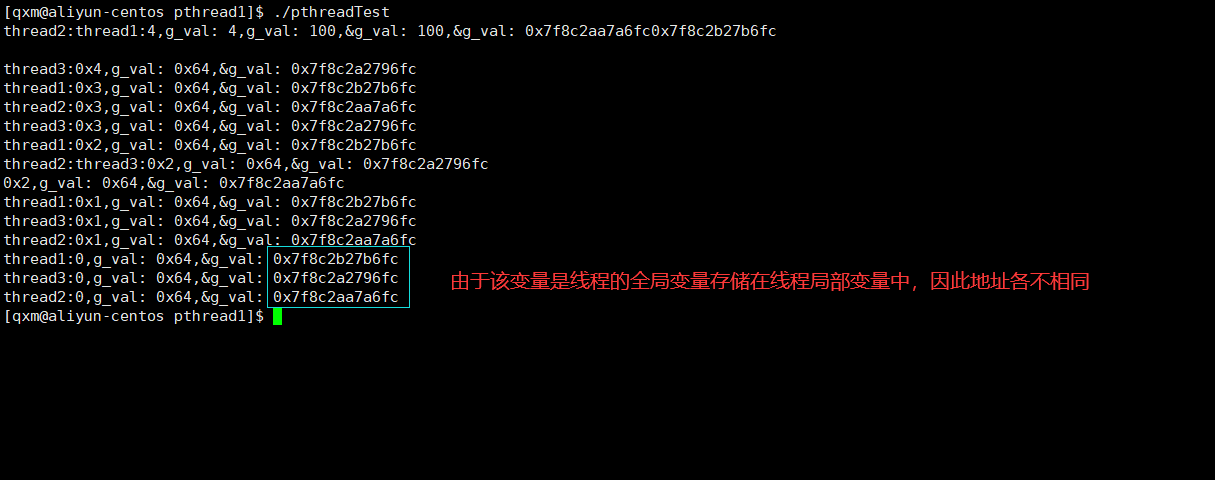
补充: 线程管理结构中线程局部存储用于存储线程相关的全局变量、线程上下文信息、隔离敏感数据。
编写如下代码进行测试:
#include <iostream>
#include <unistd.h>
#include <pthread.h>

using namespace std;

__thread int g_val = 100;//__thread将数据以线程全局变量的形式创建

void *thread_run(void *args)
{
    char* tname = static_cast<char*>(args);
    int cnt = 5;
    while (true)
    {
        cout << tname << ":" << (u_int64_t)cnt << ",g_val: " << g_val << ",&g_val: " << &g_val << endl;
        if ((cnt--)==0)
            break;
        sleep(1);
    }
    return nullptr;
}

int main()
{
    pthread_t tid1;
    pthread_t tid2;
    pthread_t tid3;
    pthread_create(&tid1, nullptr, thread_run, (void*)"thread1");
    pthread_create(&tid2, nullptr, thread_run, (void*)"thread2");
    pthread_create(&tid3, nullptr, thread_run, (void*)"thread3");
    pthread_join(tid1, nullptr);
    pthread_join(tid2, nullptr);
    pthread_join(tid3, nullptr);
    return 0;
}
编译代码并运行查看结果:
- 程序开发学习排行
- 最近发表


