

jquery easyui使用心得 - Web前端
作者:98wpeu发布时间:2026-06-29分类:网页前端技术浏览:51
导读:第一步下载JQueryeasyUI 下载地址:http://www.jb51.net/codes/70218.html第二步创建javaWEB项目第三步导入相关的文件。。...
第一步下载JQuery easyUI
下载地址:http://www.jb51.net/codes/70218.html
第二步创建java WEB项目
第三步导入相关的文件。。目录结构如下
<link rel="StyleSheet" type="text/CSS" href="easyui/themes/default/easyui.css" rel="external nofollow" rel="external Nofollow" rel="external nofollow" >
<link rel="stylesheet" type="text/css" href="easyui/themes/icon.css" rel="external nofollow" rel="external nofollow" rel="external nofollow" rel="external nofollow" >
<script type="text/javascript" src="easyui/jQuery-1.7.2.min.JS"></script>
<script type="text/JavaScript" src="easyui/jquery.easyui.min.js"></script>

<link rel="stylesheet" type="text/css" href="easyui/themes/default/easyui.css" rel="external nofollow" rel="external nofollow" rel="external nofollow" >
<link rel="stylesheet" type="text/css" href="easyui/themes/icon.css" rel="external nofollow" rel="external nofollow" rel="external nofollow" rel="external nofollow" >
<script type="text/Javascript" src="easyui/jquery.min.js"></script>
<script type="text/javascript" src="easyui/JQuery.easyui.min.js"></script>

下载个jquery-easyui-1.3.2使用,把他导入到myeclipse10里,jquery-1.7.2.min.js报错。
解决办法:
1、选中报错的jquery文件“jquery-1.7.2.min.js”。
2、右键选择 MyEclipse-->Exclude From Validation 。
3、再右键选择 MyEclipse-->Run Validation 即可。
ui1的源码:
<%@ page language="Java" import="java.util.*" pageEncoding="UTF-8"%>
<%
string path = request.getContextPath();
String basePath = request.getScheme()+"://"+request.getServerName()+":"+request.getServerPort()+path+"/";
%>
<!DOCTYPE html PUBLIC "-//W3C//DTD HTML 4.01 Transitional//EN">
<html>
<head>
<base href="<%=basePath%>" rel="external nofollow" >
<title>jquery easyui test 1</title>
<meta http-equiv="PRagma" content="no-CAChe">
<meta HTTP-equiv="cache-control" content="no-cache">
<meta http-equiv="expires" content="0">
<meta http-equiv="keywords" content="keyword1,keyword2,keyword3">
<meta http-equiv="description" content="this is my page">
<!--
<link rel="stylesheet" type="text/css" href="styles.css" rel="external nofollow" >
-->
<link rel="stylesheet" type="text/css" href="easyui/themes/default/easyui.css" rel="external nofollow" rel="external nofollow" rel="external nofollow" >
<link rel="stylesheet" type="text/css" href="easyui/themes/icon.css" rel="external nofollow" rel="external nofollow" rel="external nofollow" rel="external nofollow" >
<!-- <link rel="stylesheet" type="text/css" href="easyui/themes/icon.css" rel="external nofollow" rel="external nofollow" rel="external nofollow" rel="external nofollow" > -->
<!-- <link rel="stylesheet" type="text/css" href="easyui/demo.css" rel="external nofollow" > -->
<script type="text/javascript" src="easyui/jquery.min.js"></script>
<script type="text/javascript" src="easyui/jquery.easyui.min.js"></script>
</head>
<body>
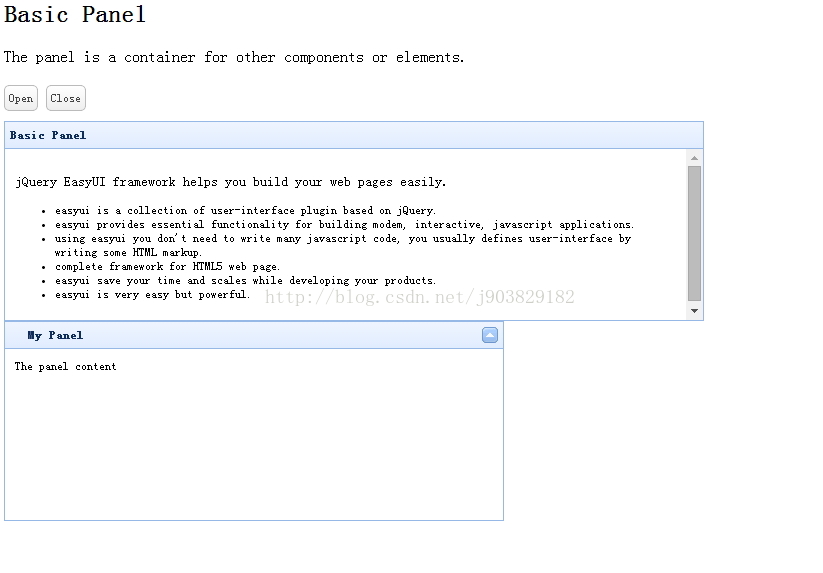
<h2>Basic Panel</h2>
<p>The panel is a contAIner for other components or elements.</p>
<div style="margin:20px 0 10px 0;">
<a href="#" rel="external nofollow" rel="external nofollow" class="easyui-linkbutton" onclick="javascript:$('#p').panel('open')">Open</a>
<a href="#" rel="external nofollow" rel="external nofollow" class="easyui-linkbutton" onclick="javascript:$('#p').panel('close')">Close</a>
</div>
<div id="p" class="easyui-panel" title="Basic Panel" style="width:700px;height:200px;padding:10px;">
<p style="font-size:14px">jQuery EasyUI framework helps you build your web pages easily.</p>
<ul>
<li>easyui is a collection of User-interface plugin based on jQuery.</li>
<li>easyui provides essential functionality for building modem, interactive, javascript APPlications.</li>
<li>using easyui you don't need to write many javascript code, you usually defines user-interface by writing some HTML markup.</li>
<li>complete framework for html5 web page.</li>
<li>easyui save your time and scales while develoPing your products.</li>
<li>easyui is very easy but powerful.</li>
</ul>
</div>
<div id="p" class="easyui-panel" style="width:500px;height:200px;padding:10px;"
title="My Panel" iconCls="icon-save" collapsible="true">
The panel content
</div>
</body>
</html>
效果图:
相关推荐
- 网页前端技术排行
-
- 1[Web前端]用javascript实现默认图片替代未显示的图片 - Web前端
- 2分析Iconfont-阿里巴巴矢量常用图标库 - Web前端
- 3基于jquery的滚动条滚动固定div(附演示下载) - Web前端
- 4【第六章】Foundation之按钮和下拉功能 - Web前端
- 5jQuery编写widget的一些技巧分享 - Web前端
- 6jQuery实例教程:制作网页中可折叠的面板 - Web前端
- 7在Mac/PC上远程调试iPhone/iPad上的网页 - Web前端
- 8jQuery实现鼠标移到元素上动态提示消息框效果 - Web前端
- 9分享精心挑选的12款优秀jQuery Ajax分页插件和教程 - Web前端
- 最近发表
-
- WordPress随机显示特色图片插件:Random Post Thumbnails
- KeePass实现Chrome浏览器自动填充密码方法一
- LNMP一键包nginx 301强制跳转到https教程
- KeePass实现Chrome浏览器自动填充密码方法二
- #建站# 免费的VPS管理软件Xshell8/Xftp8中文版下载
- 使用Xshell 8连接VPS教程_电脑登录vps的方法
- WordPress评论界面添加烟花????效果
- 不同浏览器书签同步方案:坚果云+Floccus_详细使用教程
- iOS端KeePassXC客户端APP:Strongbox Password Safe
- 给WordPress评论中的Gravatar头像图片添加ALT属性