


jQuery实现Email邮箱地址自动补全功能代码 - Web前端
作者:98wpeu发布时间:2026-08-18分类:网页前端技术浏览:300
导读:本文实例讲述了JQuery实现emAIl邮箱地址自动补全功能代码。分享给大家供大家参考,具体如下:jQueryEmail邮箱地址自动补全代码,输入Email时,会自动加入@符号...
本文实例讲述了JQuery实现emAIl邮箱地址自动补全功能代码。分享给大家供大家参考,具体如下:
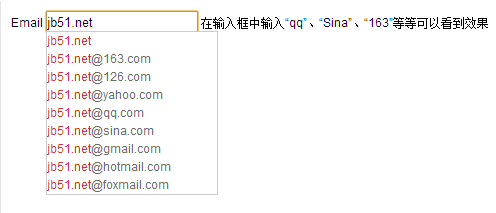
jQuery Email邮箱地址自动补全代码,输入Email时,会自动加入@符号,在输入框中输入“qq”、“Sina”、“163”等等可以看到效果;鼠标经过提示Email时,高亮该条Email,鼠标点击Email时,文本框内容替换成该条Email,并删除提示层.
运行效果截图如下:
在线演示地址如下:
http://demo.jb51.net/js/2015/jquery-email-auto-comp-codes/
具体代码如下:
<!DOCtype html PUBLIC "-//W3C//DTD xhtml 1.0 Transitional//EN"
"http://www.w3.org/TR/xHTML1/DTD/xhtml1-transitional.dtd">
<html xmlns="HTTP://www.w3.org/1999/xhtml">
<head>
<title>输入Email相关字符自动提示Email地址</title>
<script src="jquery-1.6.2.min.JS" type="text/javascript"></script>
<style type="text/CSS">
body
{
 margin:0px;
 padding:0px;
 font-family:Arial;
 font-size:12px;
 padding:10px;
}
#myemail, .newemail, .newemailtitle{
 cursor:default;
 line-height:18px;
}
</style>
</head>
<body>
Email <input id="me" type="text" value="" style="width:150px; height:18px; line-height:18px; border:1px solid #999;">
<script type="text/JavaScript">
var nowid;
var totalid;
var can1PRess = false;
var emailafter;
var emailbefor;
$(document).ready(function(){
 $("#me").focus(function(){ //文本框获得焦点,插入Email提示层
 $("#myemail").remove();
 $(this).after("<div id='myemail' style='width:170px; height:auto; background:#fff; color:#6B6B6B; position:absolute; left:"+$(this).get(0).offsetLeft+"px; top:"+($(this).get(0).offsetTop+$(this).height()+2)+"px; border:1px solid #ccc;z-index:5px; '></div>");
 if($("#myemail").html()){
  $("#myemail").css("display","block");
 $(".newemail").css("width",$("#myemail").width());
  can1press = true;
 } else {
  $("#myemail").css("display","none");
  can1press = false;
 }
 }).keyup(function(){ //文本框输入文字时,显示Email提示层和常用Email
  var press = $("#me").val();
  if (press!="" || press!=null){
  var emailtxt = "";
  var emailvar = new Array("@163.com","@126.com","@Yahoo.com","@qq.com","@sina.com","@Gmail.com","@hotmail.com","@foxmail.com");
  totalid = emailvar.length;
   var emailmy = "<div class='newemail' style='width:170px; color:#6B6B6B; overflow:hidden;'><font color='#D33022'>" + press + "</font></div>";
   if(!(iSEMail(press))){
    for(var i=0; i<emailvar.length; i++) {
     emailtxt = emailtxt + "<div class='newemail' style='width:170px; color:#6B6B6B; overflow:hidden;'><font color='#D33022'>" + press + "</font>" + emailvar[i] + "</div>"
    }
   } else {
    emailbefor = press.split("@")[0];
    emailafter = "@" + press.split("@")[1];
    for(var i=0; i<emailvar.length; i++) {
     var theemail = emailvar[i];
     if(theemail.indexof(emailafter) == 0)
     {
      emailtxt = emailtxt + "<div class='newemail' style='width:170px; color:#6B6B6B; overflow:hidden;'><font color='#D33022'>" + emailbefor + "</font>" + emailvar[i] + "</div>"
     }
    }
   }
   $("#myemail").html(emailmy+emailtxt);
   if($("#myemail").html()){
     $("#myemail").css("display","block");
     $(".newemail").css("width",$("#myemail").width());
     can1press = true;
   } else {
     $("#myemail").css("display","none");
     can1press = false;
   }
   beforepress = press;
  }
  if (press=="" || press==Null){
   $("#myemail").html("");
   $("#myemail").css("display","none");
  }
 })
 $(document).click(function(){ //文本框失焦时删除层
 if(can1press){
   $("#myemail").remove();
   can1press = false;
   if($("#me").focus()){
    can1press = false;
   }
  }
 })
 $(".newemail").live("mouSEOver",function(){ //鼠标经过提示Email时,高亮该条Email
 $(".newemail").css("background","#FFF");
 $(this).css("background","#CACACA");
  $(this).focus();
  nowid = $(this).index();
 }).live("click",function(){ //鼠标点击Email时,文本框内容替换成该条Email,并删除提示层
 var newhtml = $(this).html();
 newhtml = newhtml.Replace(/<.*?>/g,"");
 $("#me").val(newhtml);
 $("#myemail").remove();
 })
 $(document).bind("keydown",function(e)
 {
  if(can1press){
   switch(e.which)
   {
    case 38:
    if (nowid > 0){
     $(".newemail").css("background","#FFF");
     $(".newemail").eq(nowid).prev().css("background","#CACACA").focus();
     nowid = nowid-1;
    }
    if(!nowid){
     nowid = 0;
     $(".newemail").css("background","#FFF");
     $(".newemail").eq(nowid).css("background","#CACACA");
     $(".newemail").eq(nowid).focus();
    }
    break;
    case 40:
    if (nowid < totalid){
     $(".newemail").css("background","#FFF");
     $(".newemail").eq(nowid).next().css("background","#CACACA").focus();
     nowid = nowid+1;
    }
    if(!nowid){
     nowid = 0;
     $(".newemail").css("background","#FFF");
     $(".newemail").eq(nowid).css("background","#CACACA");
     $(".newemail").eq(nowid).focus();
    }
    break;
    case 13:
    var newhtml = $(".newemail").eq(nowid).html();
    newhtml = newhtml.replace(/<.*?>/g,"");
    $("#me").val(newhtml);
    $("#myemail").remove();
   }
  }
 })
})
//检查email邮箱
function isEmail(str){
 if(str.indexOf("@") > 0)
 {
 return true;
 } else {
 return false;
 }
}
</script>
在输入框中输入“qq”、“Sina”、“163”等等可以看到效果
</body>
</html>
希望本文所述对大家jquery程序设计有所帮助。
相关推荐
- JavaScript 2026:JavaScript 将迎重大更新,解决开发者的痛点 - Web前端
- 微信小程序支付手续费是多少?商家和个人有区别吗? - Web前端
- 小程序里的Canvas 2D和Web端有啥不一样? - Web前端
- 小程序appid怎么获取?不同主体、不同平台获取方式有啥区别? - Web前端
- this.setData({id})和this.setData({id:id})有什么区别? - Web前端
- 微信小程序开发者工具提示error fail to open ide该怎么解决? - Web前端
- 微信小程序基础篇:rich text组件怎么渲染富文本? - Web前端
- Userpilot是什么?如何助力产品增长与用户体验优化? - Web前端
- 微信小程序开发中的MCP是什么?该如何高效运用? - Web前端
- 网页端CAD图纸查看器开发需要关注哪些核心要点? - Web前端
- 网页前端技术排行
-
- 1[Web前端]用javascript实现默认图片替代未显示的图片 - Web前端
- 2分析Iconfont-阿里巴巴矢量常用图标库 - Web前端
- 3jQuery实例教程:制作网页中可折叠的面板 - Web前端
- 4【第六章】Foundation之按钮和下拉功能 - Web前端
- 5基于jquery的滚动条滚动固定div(附演示下载) - Web前端
- 6分享精心挑选的12款优秀jQuery Ajax分页插件和教程 - Web前端
- 7jQuery编写widget的一些技巧分享 - Web前端
- 8jQuery实现鼠标移到元素上动态提示消息框效果 - Web前端
- 9在Mac/PC上远程调试iPhone/iPad上的网页 - Web前端
- 最近发表
-
- WordPress随机显示特色图片插件:Random Post Thumbnails
- KeePass实现Chrome浏览器自动填充密码方法一
- LNMP一键包nginx 301强制跳转到https教程
- KeePass实现Chrome浏览器自动填充密码方法二
- #建站# 免费的VPS管理软件Xshell8/Xftp8中文版下载
- 使用Xshell 8连接VPS教程_电脑登录vps的方法
- WordPress评论界面添加烟花????效果
- 不同浏览器书签同步方案:坚果云+Floccus_详细使用教程
- iOS端KeePassXC客户端APP:Strongbox Password Safe
- 给WordPress评论中的Gravatar头像图片添加ALT属性